Continuous integration for django with jenkins
Yo ! Today, we’ll see how to build a django application with a continuous integration system. With this installation maybe you will loose few times, but you will save time on every deployment of the application, and we know how it can be frustrating to deploy something. So you’ll never have this feeling again because all will be automatized, you’ll just need to do a little click and let jenkins rocks :). Let’s see how to do that !!!

Jenkins
Jenkins is continuous integration server. He will give us the possibility to automatize few task like pull the sources of your project, send an email to the guy who broke the build (my favorite feature), etc… In our case, we want to use Jenkins to deploy automatically our application every time a functionnality is developped on it. It can seem easy, but not really.
JENKINS INSTALLATION
For Arch Linux :
sudo pacman -S jenkins
sudo systemctl start jenkins
For Ubuntu :
wget -q -O - https://jenkins-ci.org/debian/jenkins-ci.org.key | sudo apt-key add -
sudo sh -c 'echo deb http://pkg.jenkins-ci.org/debian binary/ > /etc/apt/sources.list.d/jenkins.list'
sudo apt-get update
sudo apt-get install jenkins
Normally, jenkins should run on your machine. His default port is the 8090, so you should be able to go on this URLhttp://localhost:8090/. (Too easy this tutorial)
Virtual Environnement installation
I give you the advice to create a virtual environment for your project. So that will protect you from every python update or just system update because your application will have his own python environment !
To install it we will do :
sudo pacman -S python-virtualenv
And after that we can create an environment easily with this command :
virtualenv /the/path/where/I/keep/my/project/
And we will use this command to activate it :
source /le/path/ou/je/stocke/mon/env/bin/activate
Easy no ?
UWSGI installation
To launch our django application, we will need of UWSGI.
For that, install uwsgi and uwsgi-python (python module for uwsgi) :
sudo pacman -S uwsgi
sudo pacman -S uwsgi-plugin-python
For Debian/Ubuntu :
sudo apt-get install uwsgi
sudo apt-get install uwsgi-plugin-python
Don’t forget to adapt that in function of your python version. In my case, I’m using the third version.
However the problem is, our installation is dependant of the system again. So we should install uwsgi directly from the virtual environnement to keep a safe environment. For that we have to use pip or add uwsgi to our requirements.txt file and we will not need the plugin now.
pip install uwsgi
Launching our django application
Now, you have to choice, configure jenkins and wait his first deploy to have the project sources on your server, or you have already a version of it on your server. Here we’ll suppose we have it already. To easily run our application, we will need an .ini file to configure properly UWSGI execution. Here’s an example .ini file for my project mon-amour-pour-jean-travolta
#mon-amour-pour-jean-travolta.ini file
[uwsgi]
# We specify the module to use (no need if you installed uwsgi with pip)
plugins = python
# Django-related settings
# Project root (where is manage.py)
chdir           = /path/to/your/application/mon-amour-pour-jean-travolta/
# wsgi file
module          = mon-amour-pour-jean-travolta.wsgi:application
# Absolute path to your virtual environmentChemin absolu vers l'environnement virtuel
home            = /path/to/your/application/mon-amour-pour-jean-travolta/venv-python3-application/

# process-related settings
# master
master          = true
# Number of worker for your application
processes       = 10
# Unix socket
socket          = /chemin/vers/lapplication/mon-amour-pour-jean-travolta/juanwolfs-blog.sock
# If you want to let open your application on this server without an nginx, uncomment the line below
# socket = 127.0.0.1:8888
# Socket permission
chmod-socket    = 644
# processus user
uid = jean-travolta
# processus group
gid = jean-travolta
# socket owner
chown_socket = jean-travolta
# Create a server for your application (let this value commented the time to debug everything)
# daemonize = /var/log/uwsgi/juanwolfs-blog.log
# Clean the environment when we kill the application
vacuum          = true
If everything is well done, your application should run with the command :
uwsgi --ini mon-amour-pour-jean-travolta.ini
Here, the problem is we can’t properly restart automatically the application, we need to kill the process and relaunch it. After few useless researches, I had to ask the advice of an expert. Here’s what he said :
@Juan__Wolf I tend to use touch-reload (http://t.co/cGNueQDzad), which allows you to specify a file that, when touched, restarts uwsgi.
— Dominic Rodger (@dominicrodger) March 17, 2015
Thanks a lot @dominicrodger for the help ! So let’s add the option to our command:
uwsgi --ini mon-amour-pour-jean-travolta.ini --touch-reload mon-amour-pour-jean-travolta.ini
# And we use this command to reload it
touch mon-amour-pour-jean-travolta.ini
Automatisation
Now, we have the tools we need to deploy our application with only one click. We need to create the job which will execute all the command we should execute if we did the deployment manually. It’s simple, we want: pull the source, launch the virtual environment, download the dependencies, launch the test, change the database if it needs to (I use a django module for that called South), generate translation files, restart the application and leave the virtual environment.
Jenkins Configuration
To pull the sources of our application, we will need to host this code somewhere using git or svn or cvs (or dropbox, LOL, just kidding). If you’re using git, you’ll need to install a plugin for it. Just go in Manage Jenkins -> Manage Plugin -> “Availables” -> “GIT plugin”. And if you wanted to install your application to an other server by ssh, install the “Publish Over SSH” plugin.
Job Creation
We will create our job, for that click on “new item”. For this example, I will call my job “jean-travolta-l-integration-qui-envoie-du-pate” (don’t worry if you don’t get a clue of what it means), and select free-style project. Now we have to configure the job to make him doing all the task we say previously. Let’s start with “pulling the sources”.
Pulling the sources
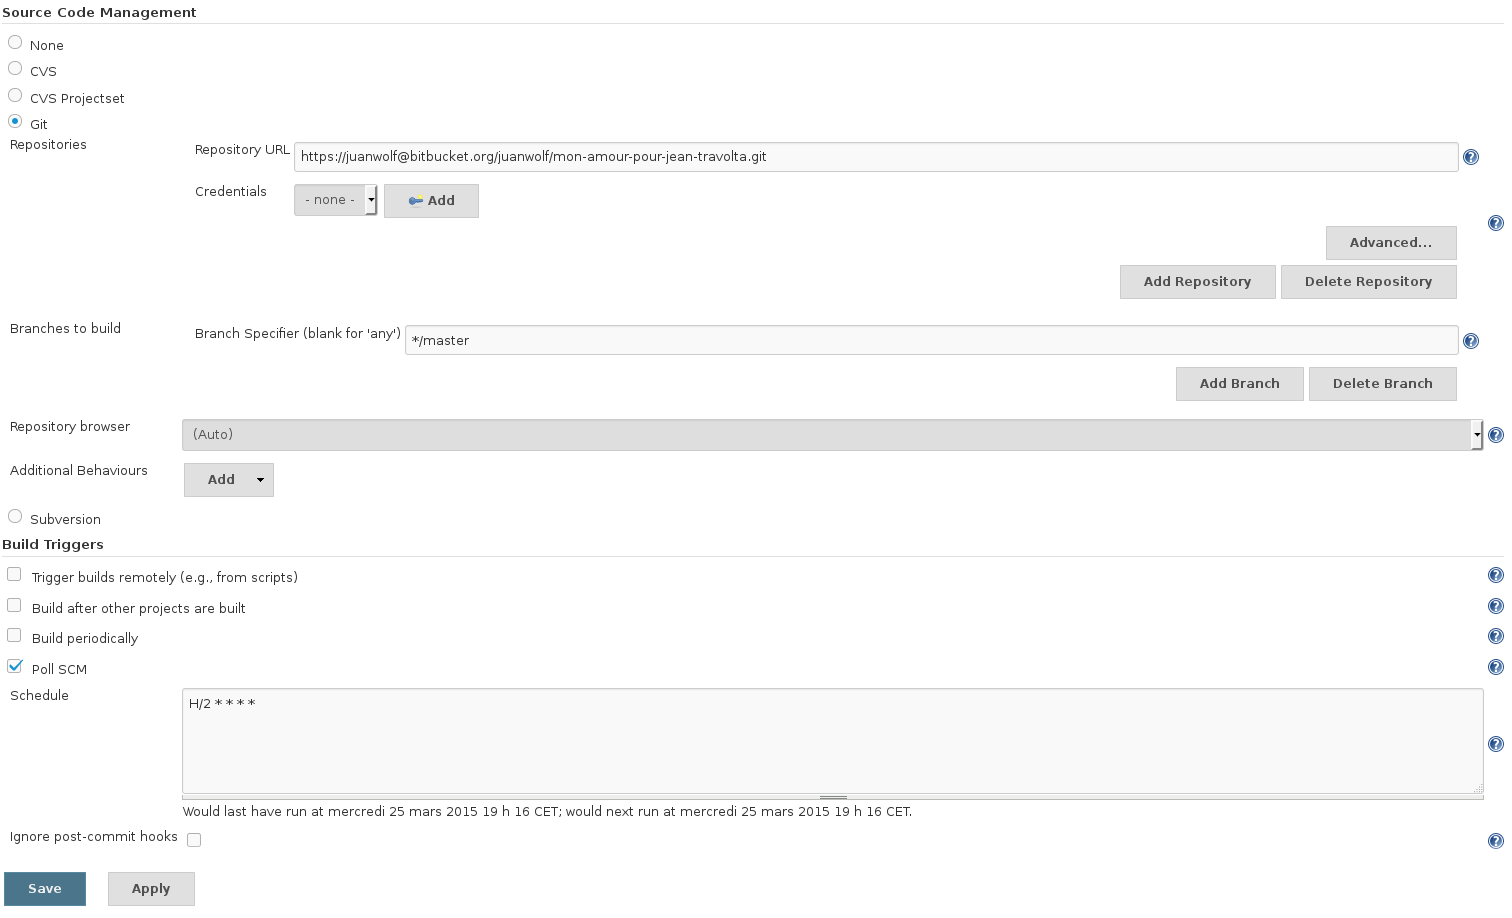
Rendez-vous to the section “gestion du code source”. You have many options (CVS, Subversion, Git (If you installed the plugin)). In my case, I will use git and put this values :

Put some attention on the branch option, you can specify which branch you want to pull and that’s really usefull when you’re working on different branch for different environment. For the last section we will say to jenkins to check if there’s modifications on the git repository every two minutes and if there’s it will launch the build.
Building
Now, we just need to do all the rest. So we will create a little script (bash) which will execute everything for us. Mine looks like that :
#!/bin/bash
virtualenv -q venv-python3-blog # Virtual Environment creation if it doesn't exist
source ./venv-python3-blog/bin/activate # Activate the virtual environment
pip install -r $WORKSPACE/requirements.txt # Install all the dependencies for the application
python $WORKSPACE/mon-amour-pour-jean-travolta/manage.py test blogengine # Launching tests

python $WORKSPACE/mon-amour-pour-jean-travolta/manage.py schemamigration blogengine --auto --update # Find if there's modification in the database (SOUTH)
python $WORKSPACE/mon-amour-pour-jean-travolta/manage.py migrate # apply modification in the database
cd $WORKSPACE/mon-amour-pour-jean-travolta/;
python manage.py compilemessages # Generate translations files

touch $WORKSPACE/mon-amour-pour-jean-travolta.ini # Restart the application

deactivate # We leave the virtual environment
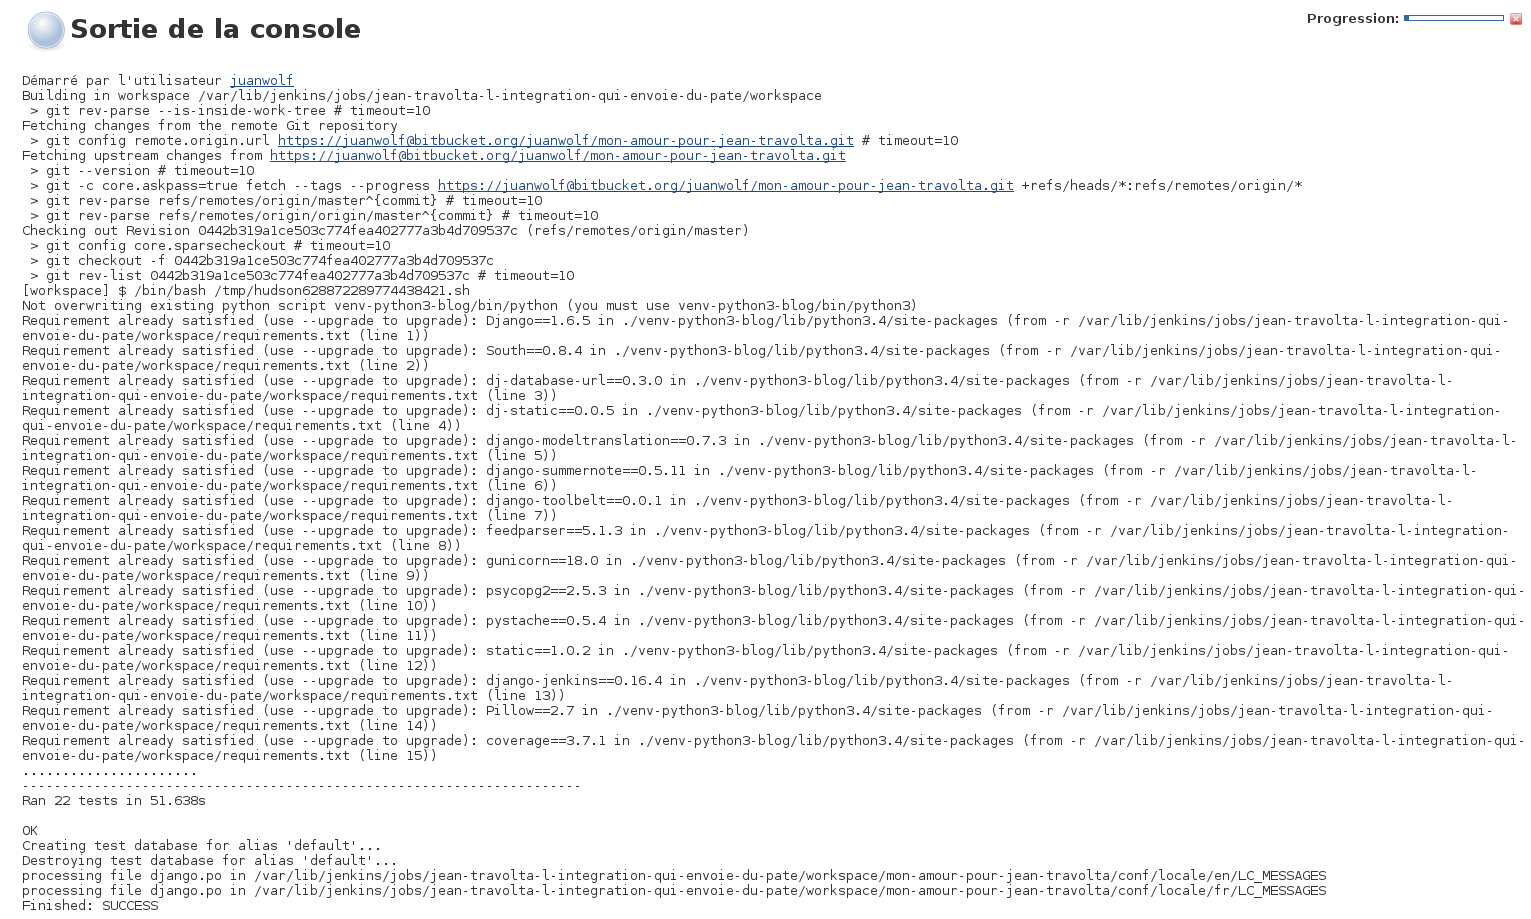
Launch the build, and normally we should have something like that :

Et voilà, We have our continuous integration platform for our django application ! However, about tests, we don’t have any reports or good metrics about the quality of our production (except in the console, but that’s not mean anything).
BONUS - Create tests reports
The goal here is to use tools to evaluate the quality of our code. for that,, we will need to modify a little bit our project and our jenkins build. Firstly, install the JUnit, Cobertura and Violation plugin inside Jenkins! For the project, you’ll need to add django-jenkins and coverage as requirements inside your … requirements file. This django module will create the report which will be rendered in jenkins (nice, isn’t it?). So let’s add that to our requirement.txt :
django-jenkins==0.16.4
coverage==3.7.1
So now, we will modify a little bit our build. Firstly, change in your bash script the line where we were running the tests to use our new depency “django-jenkins” :
#OLD
#python $WORKSPACE/mon-amour-pour-jean-travolta/manage.py test blogengine
# New
python $WORKSPACE/mon-amour-pour-jean-travolta/manage.py jenkins --enable-coverage blogengine
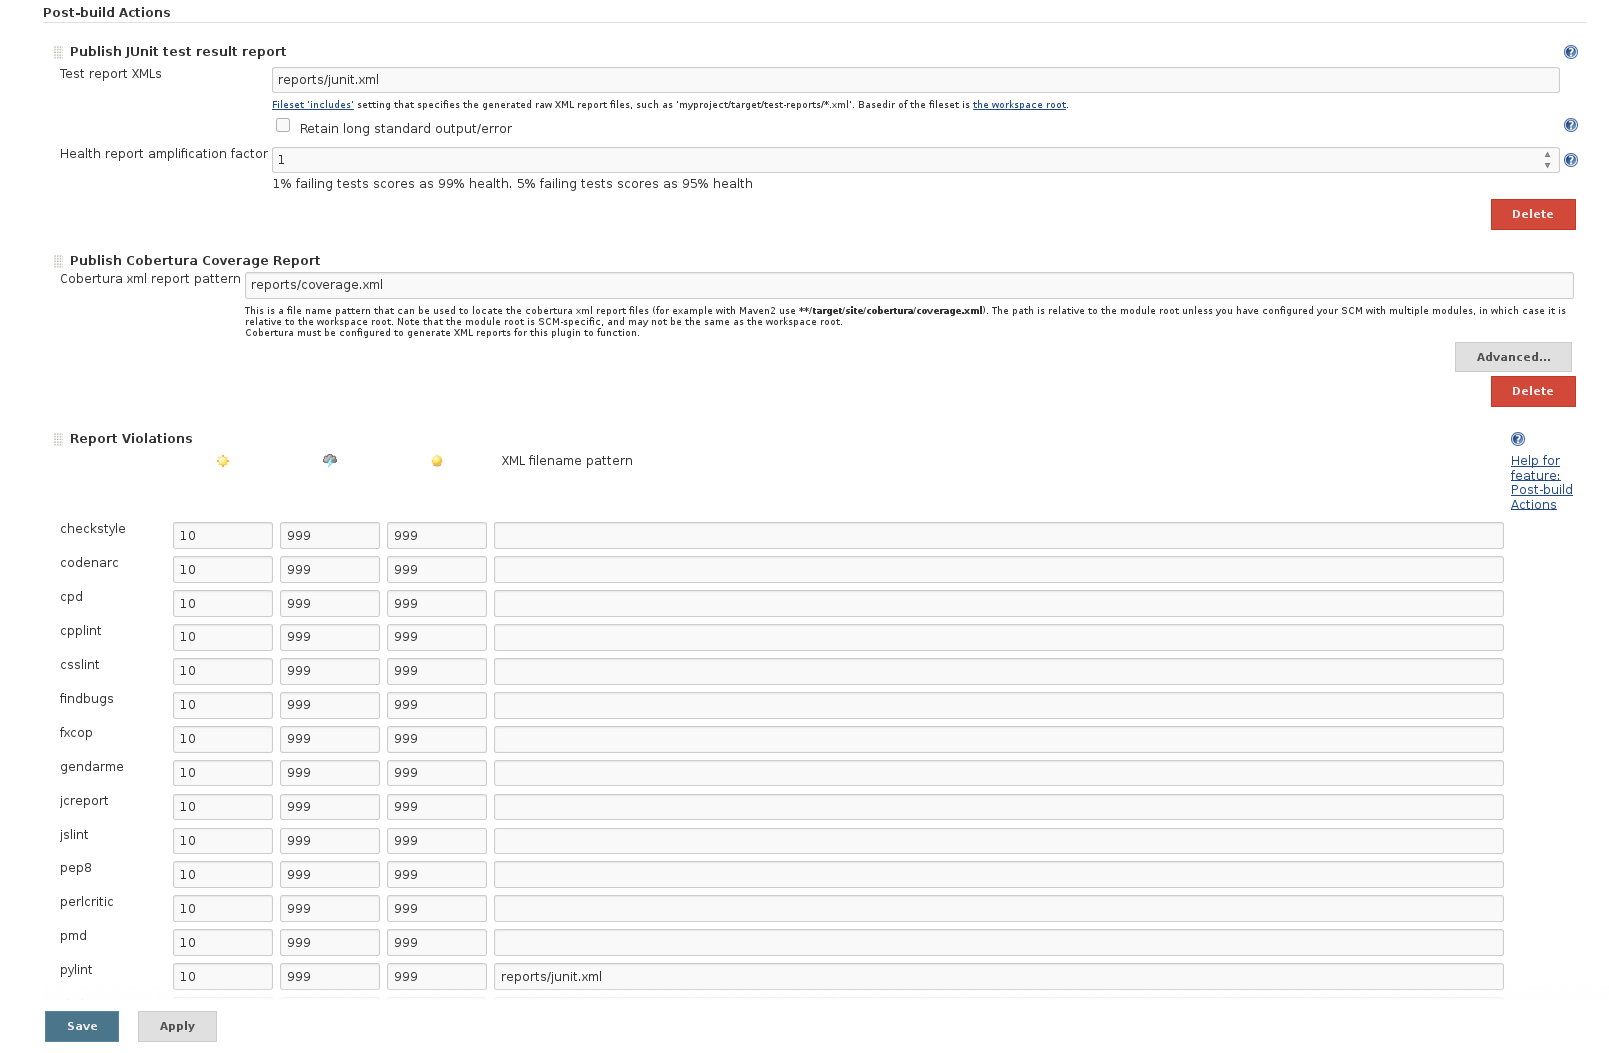
Now, let’s add our report rendering like that :

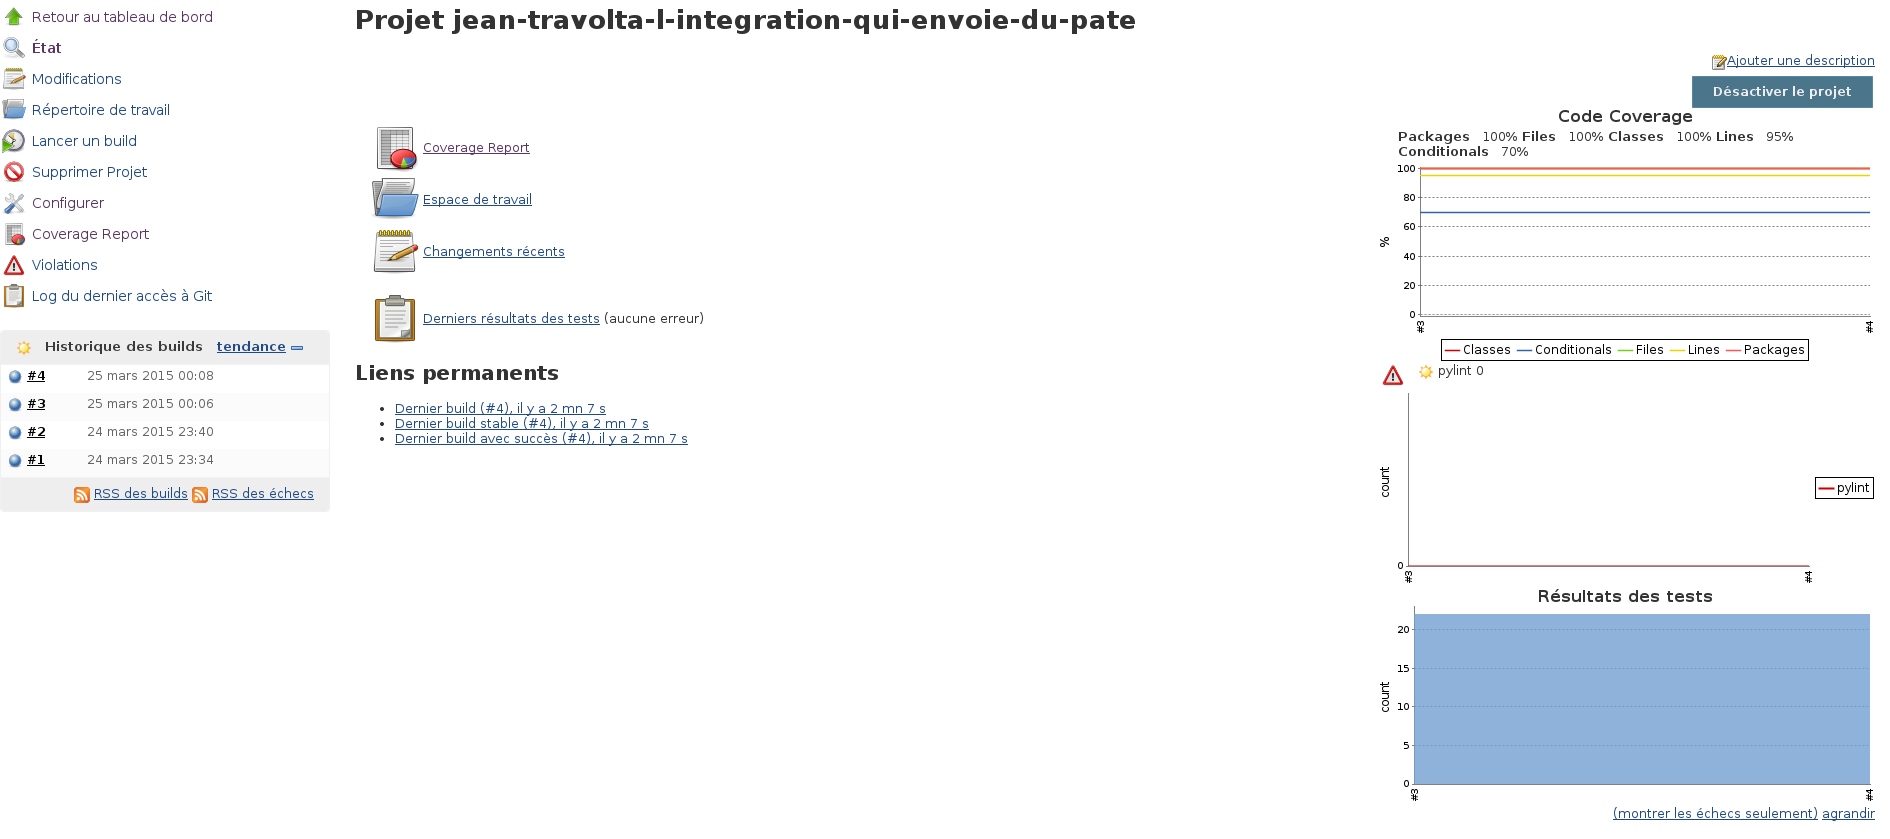
And if we launch few times the build (JUnit plugin need to be built twice to render), we will have this nice layout :

So I’m able now to say that my 22 tests cover more than 90% of the code of my application. YEAH YEAH YEAH.
Conclusion
Now you have no excuse to not develop your django application now you have nothing to do to put it in production ! You just install a software factory which give quality indications on your application and that’s quite good if you want to build a software with many people so you are able to reject some commit if the quality is not good enough. If you know other metrics / renderer / informations really useful to integrate inside jenkins, let me know I will love you ! Well I let you code ! Codez bien, Ciao !